
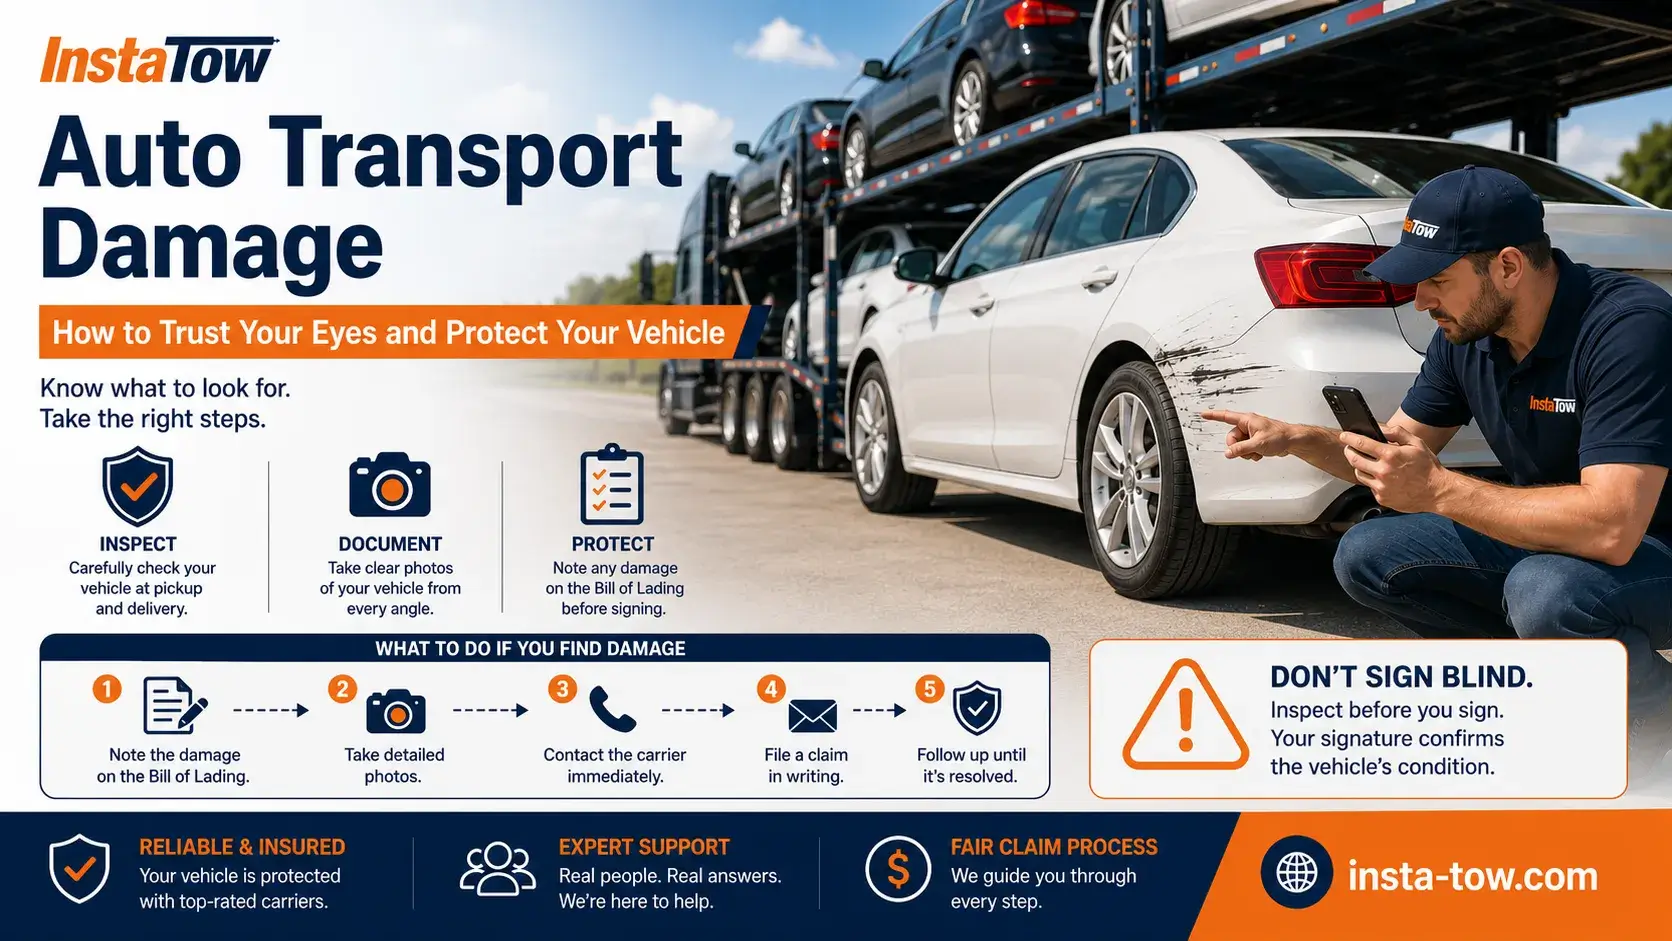
You receive your vehicle after transport and notice a scratch, dent, or mechanical issue but how do you know whether it is new, pre-existing, or actually caused during shipping?
When dealing with auto transport damage, vehicle owners often experience an initial wave of uncertainty, but resolving the situation effectively requires a methodical diagnostic approach rather than a hasty reaction.
Treating this guide as a comprehensive Damage Investigation Guide rather than a basic claims manual ensures you accurately assess the true origin of any flaw.
Before jumping to conclusions, every evaluation must center on three critical analytical questions:
What physical or mechanical changes occurred between pickup and delivery?
When precisely could the incident have taken place along the transport route?
What verifiable documentation or evidence connects the condition directly to the transit process?
What Counts as Auto Transport Damage?
Auto transport damage encompasses any verifiable physical, cosmetic, or mechanical alteration sustained by a vehicle from the moment it is loaded onto a carrier until it is officially handed over at delivery.
Identifying genuine flaws requires distinguishing between transit-induced impacts and pre-existing wear to ensure accurate reporting.
New Physical Damage That Was Not Present at Pickup
New physical flaws include fresh cosmetic surface marks or structural impacts that were entirely absent during the initial loading inspection.
These surface-level or panel-level flaws are among the most frequently documented issues during vehicle transit.
New surface scratches exposing bare metal or primer
Fresh body dents from tie-down straps or handling
Distinct paint chips from airborne road debris
Broken, cracked, or misaligned side mirrors
Bumper scrapes, cracks, or loose panel fasteners
Wheel curb rash or rim gouges from securement tension
Damage That May Appear After Unloading
Certain functional anomalies may not manifest immediately as visible surface flaws but instead present themselves operationally after the vehicle is driven off the trailer.
Recognizing these symptoms early helps safeguard against overlooked mechanical wear.
Undercarriage scrapes caused by steep loading ramps
Suspension issues resulting from excessive bouncing or improper anchoring
Alignment problems stemming from severe road shocks or rigid tie-down strain
Mechanical symptoms such as unusual vibrations or fluid leaks
Problems That Are Not Automatically Transport Damage
Distinguishing actual transit incidents from pre-existing conditions or normal operating wear is essential, as not every imperfection found upon delivery qualifies for a car shipping damage claim.
Understanding these boundaries prevents unnecessary disputes with carriers.
Existing scratches and chips clearly documented on the original inspection report
Pre-existing dents or body rust logged prior to transport
Normal mechanical failures unrelated to the loading or driving process
Low tire pressure caused by natural temperature drops during transit
Warning lights triggered by dormant electrical glitches or drained batteries
Pre-existing environmental weathering, sun fading, or minor stone pecks from pre-shipping driving
Through a structured evaluation framework, Instatow helps vehicle owners differentiate between actionable transit flaws and pre-existing vehicle conditions before filing formal documentation.
The 4-Question Test: Is the Damage Related to Auto Transport?
A structured decision framework allows vehicle owners to systematically verify whether a newly discovered flaw stems directly from shipping operations rather than pre-existing wear.
Walking through a logical sequence of checks eliminates guesswork and establishes a solid foundation if you need to file auto transport damage claims later.
1. Was the damage visible at pickup? If the answer is yes, the issue is almost certainly a pre-existing condition logged before transit.
If the flaw was not present when the vehicle was loaded, proceed to the next verification step.
2. Is the damage in an area exposed to transport risks? Transit-related issues typically appear on exterior panels, wheels, the undercarriage, or primary loading contact points rather than protected interior components.
3. Does the delivery condition differ from the pickup condition? Direct comparisons between your initial pickup photos, the delivery photographs, and both copies of the Bill of Lading (BOL) will confirm whether a physical alteration occurred.
4. Is there a plausible transport-related cause? Every type of physical impact aligns with specific mechanical or environmental interactions during transit, as outlined below.
Auto Transport Damage by When It Happens
Categorizing flaws according to the exact timeline stage when they occurred provides clarity when evaluating car hauling scratches or hidden transit defects.
Understanding when an incident took place helps determine liability and simplifies the resolution process.
Damage Before Pickup
Flaws categorized under this phase existed prior to the carrier's arrival and are typically unrelated to any transit activities.
Previous accidents or minor parking lot collisions
Long-term environmental wear or exposure to weather
Pre-existing body scratches or unpainted surface chips
Damage During Loading
Loading operations involve steep ramps, tight spatial constraints, and mechanical positioning that can introduce sudden physical impacts.
Scraped front bumpers due to low ground clearance
Undercarriage contact with the ramp lip
Wheel or rim damage from winch cables or guide tracks
Damage During Transit
Once secured on the trailer, vehicles remain exposed to external road hazards and long-distance movement stressors.
Road debris impacts hitting windshields or body panels
Shifted tie-down equipment causing friction marks
Vibration-induced wear on unsecured components
Damage During Unloading
The offloading phase carries similar risks to loading as the vehicle transitions from an elevated trailer deck back down to street level.
Bumper scraping against the ramp incline
Sudden ground clearance impact upon trailer exit
Minor handling mishaps in tight delivery locations
Damage After Delivery
Discovering an issue hours or days after the driver departs does not automatically prove it happened post-delivery, but it does complicate the verification timeline.
Reviewing time-stamped delivery logs immediately upon receipt prevents disputes regarding when the alteration actually occurred.
related topics: Secure Auto Shipping: Complete Guide to Safe Vehicle Transport
The Auto Transport Damage Timeline: From Pickup to Delivery
The auto transport damage timeline traces every operational phase of a vehicle shipment from initial loading to final offloading, establishing a chronological record that makes identifying flaws straightforward.
Tracking this sequence protects against disputes by isolating when specific incidents happened.
Stage 1: Before Pickup: Thoroughly clean your car and document its baseline exterior condition, existing blemishes, wheels, glass, and accessible undercarriage areas with timestamped photos.
Stage 2: Pickup Inspection: Compare your personal photos directly against the driver's Bill of Lading (BOL) to ensure any pre-existing imperfections are explicitly noted before signing.
Stage 3: During Transport: Recognize that physical exposure during transit involves continuous highway vibration, weather shifts, and potential road debris hazards that can lead to vehicle shipping damage.
Stage 4: Delivery Inspection: Conduct a meticulous physical evaluation of the car before signing the final delivery paperwork or allowing the driver to depart.
Stage 5: After Delivery: If an issue surfaces later, refrain from attempting immediate repairs; instead, preserve all original evidence and notify the carrier promptly.
How to Inspect a Vehicle for Auto Transport Damage
Inspecting a vehicle for transit issues requires a systematic examination broken down by high-risk structural and cosmetic zones rather than a casual walkaround.
Splitting your focus across specific vehicle areas ensures no subtle flaw goes unnoticed.
Exterior Panels
Checking exterior panels immediately reveals surface disruptions caused by shifting straps, weather exposure, or handling mishaps.
Scan the hood, roof, doors, fenders, and quarter panels for fresh abrasions.
Examine the trunk lid and surrounding trim for handling impacts.
Low-Clearance Areas
Low-clearance zones bear the brunt of steep trailer ramps, road dips, and improper loading angles during transport.
Inspect the front bumper lip and lower valance for scraping.
Check side skirts and accessible undercarriage framing for fresh contact marks.
Wheels and Tires
Wheels and tires face intense mechanical tension from tie-down straps and positioning equipment during transit.
Look for new rim curb-like marks or wheel scratches.
Verify tire sidewall integrity and check that all valve caps remain securely in place.
Glass, Lights, and Mirrors
Glass components, exterior lighting, and mirrors are highly vulnerable to airborne road debris kicked up by passing highway traffic.
Inspect the windshield and side windows for new chip impacts or stress cracks.
Check headlights and taillights for housing cracks or moisture intrusion.
Verify that side mirrors fold correctly and show no structural framing damage.
The 10-Minute Delivery Inspection Protocol
A systematic 10-minute delivery inspection protocol provides a structured, time-blocked framework to catch vehicle shipping damage before the driver leaves and final paperwork is signed.
Rather than performing a casual glance, executing a timed sequence ensures every high-risk zone is thoroughly evaluated.
Minute 1-2: Walk Around the Vehicle: Keep the doors closed and conduct a broad perimeter walk to scan for obvious new scratches, dents, paint transfer, or loose parts.
Minute 3-4: Compare Major Panels: Match the current surface conditions against your pickup photos to verify body panel integrity across the doors, hood, roof, and fenders.
Minute 5-6: Inspect Wheels and Lower Areas: Focus intently on wheels, tires, and lower bumpers where ramp contact and tie-down tension frequently cause blemishes.
Minute 7-8: Check Glass, Lights, and Mirrors: Systematically review the windshield, side windows, headlights, taillights, and side view mirrors for stress cracks or chip impacts.
Minute 9-10: Review the Documents: Cross-examine the pickup Bill of Lading, delivery Bill of Lading, and your inspection photos side by side before releasing the driver.
How to Tell New Damage from Pre-Existing Damage
Telling new flaws from pre-existing blemishes requires comparing exact locations, physical textures, photographic records, and surrounding evidence to eliminate uncertainty during a car shipping damage claim.
Establishing clear distinguishing factors prevents carriers from misidentifying fresh impacts as historical wear.
Compare Exact Location
Checking whether a mark sits precisely where an old blemish was already documented prevents false claims.
If a scratch appears in an entirely clean, previously undamaged area, its origin points directly to the recent transit window.
Compare Shape and Texture
Physical characteristics often reveal the age of a surface mark:
Old scratch: Typically appears faded, weathered, oxidized, or filled with microscopic road grime.
New scratch: Features sharp, unweathered edges, exposed fresh primer or metal, or distinct paint transfer from a foreign object.
Compare Photos, Not Memory
Relying on mental recollection such as assuming an imperfection was not there weakens your standing during auto transport damage claims.
Always evaluate conditions using timestamped digital photos, inspection records, and signed delivery paperwork rather than subjective memory.
Look for Secondary Evidence
Corroborating physical signs often accompany transit impacts to confirm their recent origin:
Fresh paint transfer matching transport equipment or straps
Broken plastic clips or missing hardware fasteners near the impact zone
Fresh debris, stone dust, or unweathered road grime surrounding the mark
New fluid leaks or fresh mechanical residues
What Evidence Makes an Auto Transport Damage Claim Stronger?
A robust evidence file built on a clear hierarchical structure provides the strongest foundation for winning auto transport damage claims.
Organizing your proof from direct visual comparisons to supporting documentation ensures carriers and insurers cannot easily dismiss your case.
Tier 1: Direct Condition Comparison: High-resolution pickup photos and delivery photos taken from the exact same angle and focusing on identical damage locations serve as the most irrefutable proof.
Tier 2: Transport Documentation: The signed Bill of Lading (BOL), driver inspection notes, and official delivery records establish official operational parameters.
Tier 3: Supporting Evidence: Independent mechanic repair estimates, third-party inspection reports, and formal witness statements validate the financial and structural extent of the issue.
Tier 4: Circumstantial Evidence: Analysis of the transport route, loading conditions, precise time of discovery, and specific damage location strengthen the logical narrative of transit-related impact.
Auto Transport Damage Evidence: What to Photograph and How
Capturing clear, methodical, and uncompressed digital photographs is the single most effective way to validate a vehicle shipping damage dispute.
Proper photographic technique eliminates ambiguity and ensures your evidence stands up to rigorous carrier review.
Photograph the Entire Vehicle: Capture wide-angle shots of all four sides to establish the overall vehicle context and prove the environmental surroundings during inspection.
Photograph the Damage Up Close: Take multiple macro-level photos of the affected area using clear lighting and a scale reference to highlight depth and texture.
Photograph the Surrounding Area: Shoot the wider panel context adjacent to the blemish so reviewers can instantly verify where the issue is located on the car body.
Photograph the Vehicle Identification: Clearly capture the Vehicle Identification Number (VIN) and license plate to tie the photos directly to the specific transported asset.
Preserve Original Files: Keep uncompressed raw files with intact digital metadata rather than relying on heavily compressed social media uploads or casual screenshots.
Common Auto Transport Damage Scenarios and How to Analyze Them
Analyzing common transit mishaps involves mapping each incident to its likely cause, comparing pickup versus delivery documentation, and following a logical path to substantiate auto transport damage claims.
Rather than jumping to conclusions, evaluating the precise scenario helps clarify responsibility.
A New Scratch on the Door
A fresh door scratch typically originates from handling equipment, tight trailer spacing, or airborne road debris during long-distance transit.
To verify whether the mark occurred during shipping, review these key comparison points:
Match pickup and delivery photos taken from the exact same angle.
Cross-examine the physical characteristics of the blemish against notes on the Bill of Lading.
Check for foreign paint transfer that matches transport strap colors.
A Scraped Lower Bumper
Lower bumper scrapes are usually caused by steep trailer loading ramps, low vehicle ground clearance, or factory body modifications.
When analyzing this specific type of car shipping damage, consider these factors:
Assess whether your vehicle features lower custom ground effects or lowered suspension.
Review loading angle dynamics and ramp clearance limits.
Compare front bumper condition logs before and after transit.
A Damaged Wheel
Wheel blemishes and rim gouges generally stem from over-tensioned tie-down straps, improper winch securement, or low-speed ramp impacts.
Confirming the root cause involves checking:
Whether the wheel marks align with the direct points where strap hooks were secured.
If curb-like abrasions appear on rims that were pristine at pickup.
Photographic evidence of the wheels prior to loading.
A Mechanical Problem After Delivery
Mechanical issues identified right after delivery require careful differentiation between genuine transport-related impacts and coincidental component failures.
Resolving these instances usually necessitates:
Documenting any warning lights or operational oddities immediately upon offloading.
Scheduling an independent diagnostic inspection with a certified mechanic.
Comparing operating logs to verify if the symptom existed prior to shipping.
Hidden Auto Transport Damage: What You Cannot See During a Quick Walkaround
Hidden transit damage refers to structural, mechanical, or alignment issues that remain completely invisible during a standard surface-level vehicle walkaround.
Uncovering these underlying problems requires paying close attention to how the vehicle drives and handling the initial post-delivery test drive with caution.
Undercarriage Damage
Undercarriage damage involves scrapes, bent frame components, or pierced oil pans caused by bottoming out on steep trailer ramps.
Inspecting these hidden areas requires lifting the vehicle or checking low angles for:
Fresh metal scrapes on structural frame rails.
Fresh fluid drips beneath the engine bay or transmission housing.
Loose or missing plastic underbody shields.
Alignment Problems
Alignment problems occur when violent highway vibrations or over-tightened transport straps throw steering geometry out of factory specification.
Identifying alignment shifts involves noticing:
The steering wheel sitting off-center while driving straight.
The vehicle pulling persistently to the left or right.
Uneven or rapid tire tread wear immediately following delivery.
Suspension Issues
Suspension damage presents as broken struts, compromised springs, or damaged control arms resulting from extreme bouncing during long-haul transport.
Drivers should look for:
Excessive vehicle bouncing over minor road bumps.
Unusual clunking noises originating from the front or rear suspension.
Sagging corner heights when parked on level ground.
Mechanical Symptoms
Mechanical symptoms include new engine vibrations, unusual driving noises, or unexpected fluid leaks that emerge immediately after transport.
Monitoring these issues protects against secondary engine or transmission failures.
Excessive cabin vibration during idle or acceleration.
Grinding sounds when applying the brakes.
Unusual engine compartment smells or pressure drops.
When to Stop Driving the Vehicle
You must stop driving the vehicle immediately if you experience severe fluid leaks, heavy steering vibration, or compromised braking functions.
Continuing to operate a compromised vehicle can worsen the issue and jeopardize your car shipping damage claim.
Key indicators that require an immediate tow include:
Active engine oil, coolant, or transmission fluid puddles.
Complete loss of steering control or severe wheel wobble.
Total failure or sponginess in the brake pedal response.
What to Do If You Discover Damage After the Driver Leaves
Discovering auto transport damage after the driver departs requires acting methodically based on the elapsed time to protect your claim.
When you find an issue post-delivery, the window of discovery directly dictates your immediate documentation steps and carrier notification strategy.
Scenario 1: You Notice It Minutes Later
What to do immediately: Contact the driver and transport company dispatch instantly while they are still in the immediate vicinity.
What evidence to preserve: Timestamped delivery photos, recent call logs, and your copy of the signed delivery receipt.
What makes the situation harder: The driver may argue that the vehicle experienced a post-delivery incident after departure.
What not to do: Do not drive the car away from the drop-off location before capturing visual proof.
Scenario 2: You Notice It Later the Same Day
What to do immediately: File a formal written damage notice via email or customer portal to both the carrier and shipping broker within 24 hours.
What evidence to preserve: Clear daylight photographs, delivery paperwork, and written communication timestamps.
What makes the situation harder: The absence of initial notations on the signed delivery receipt invites carrier resistance.
What not to do: Do not attempt quick cosmetic touch-ups or schedule professional body shop repairs immediately.
Scenario 3: You Notice It the Next Morning
What to do immediately: Document the current lighting and environmental conditions, capture clear photos, and notify the carrier in writing right away.
What evidence to preserve: Morning lighting photos, garage or driveway context, and all initial tracking documents.
What makes the situation harder: An extended time lapse gives carriers room to question whether the car was operated overnight.
What not to do: Do not wait beyond standard carrier reporting windows, which typically require notification within 24 to 48 hours.
Scenario 4: You Notice It Days Later
What to do immediately: Review your original delivery inspection logs and check whether the issue involves hidden mechanical or structural components.
What evidence to preserve: Detailed repair estimates, certified mechanic inspection reports, and initial pickup comparisons.
What makes the situation harder: Proving direct carrier liability becomes exceptionally difficult after several days of personal driving.
What not to do: Do not alter the vehicle structure or discard damaged parts before securing professional documentation.
What If the Driver Refuses to Document the Damage?
If a delivery driver refuses to document auto transport damage on the Bill of Lading, you should avoid confrontation and instead build an independent digital evidence file.
Documenting the vehicle condition yourself protects your rights when immediate driver cooperation falls short.
De-escalate and Document Privately: Do not enter into a heated verbal argument with the driver; instead, quietly focus on capturing comprehensive visual proof of the vehicle and the surrounding drop-off location.
Photograph the Paperwork: If the driver refuses to sign or grant a physical document copy, use your smartphone to photograph every completed page of the delivery paperwork before they pull away.
Log Vital Metadata: Record the exact timestamp, street address, carrier company name, and truck license plate numbers in your notes.
Issue Written Notice Immediately: Send a formal written notification with your photo attachments via email to the carrier and broker within hours of delivery.
Handle Night Deliveries with Extra Care:
Use portable phone lighting or auxiliary flashlights to illuminate dark areas during your inspection.
Capture wide and close-up photos that explicitly document the low-light drop-off conditions.
Perform a secondary, thorough vehicle inspection under bright natural daylight the following morning to catch missed flaws.
What Does Auto Transport Insurance Usually Cover?
Auto transport insurance typically covers direct physical harm, cosmetic impacts, and structural alterations caused by carrier negligence or transit accidents, provided the incidents fall within the policy's defined limits and terms.
While policy structures vary across providers, understanding exact coverages and standard exclusions prevents unexpected financial surprises during a vehicle shipping damage claim.
Physical Damage During Transport
Auto transport insurance policies fundamentally cover accidental physical harm inflicted on a vehicle while it is secured on the carrier trailer during transit.
This primary coverage addresses unexpected highway hazards and transit incidents that compromise exterior body panels.
Exterior panel dents and major surface scratches caused by transit shifting
Windshield and glass breakage resulting from airborne highway gravel
Structural frame or body distortions stemming directly from carrier collisions
Damage During Loading and Unloading
Coverage extends to incidents that occur during the critical loading and unloading phases when a vehicle is moving on or off the transport trailer ramps.
Because these transitional maneuvers carry heightened risk, standard carrier cargo policies protect against:
Ramp-related bumper scrapes and lower valance damage
Winch cable slips or handling errors that impact vehicle bodywork
Undercarriage strikes resulting from steep trailer angles or low ground clearance
Possible Exclusions
Despite comprehensive policy definitions, standard auto transport insurance excludes several specific categories of loss that fall outside carrier liability.
Vehicle owners must note these common policy exclusions before shipping:
Pre-existing damage clearly documented on the initial pickup inspection report
Personal belongings or personal items left inside the vehicle during transport
Mechanical failure unrelated to transport handling or transit stress
Act of God weather events such as severe hail or flash floods depending on policy terms
Undisclosed vehicle modifications or custom lower clearances not communicated prior to booking
Why Fully Insured Does Not Mean Everything Is Covered
The marketing phrase fully insured does not guarantee that every conceivable flaw or minor blemish is automatically compensated under standard carrier cargo policies.
Insurers operate strictly within policy deductibles, cargo liability limits mandated by federal regulations, and strict documentation requirements, making proper inspection and timely evidence preservation essential.
you can also read: The Car Shipping Process: What Happens From Quote to Delivery?
Who Is Responsible for Auto Transport Damage?
Responsibility for transit-related flaws is shared across distinct operational entities, where the carrier executes the physical haul, the broker coordinates logistics, the insurer evaluates policy coverage, and the customer handles inspection duties.
Understanding each party's role clarifies who holds authority and accountability during an auto transport damage dispute.
The Carrier: The licensed motor carrier physically operating the truck and trailer bears direct legal responsibility for the safe transit and delivery of your vehicle. Carriers maintain motor truck cargo insurance and handle physical loading operations, but they cannot alter policy terms or override documented pickup conditions.
The Broker: The shipping broker acts as an intermediary, connecting customers with licensed carriers and managing logistics coordination. While brokers facilitate booking and communication, they do not own the trucks, operate the transport equipment, or make final insurance claim payouts.
The Insurance Company: The underwriter evaluates formal claims, reviews documentation such as the Bill of Lading, and determines financial payout eligibility based strictly on policy limits and exclusions. Insurers decide coverage validity but do not oversee daily transport operations.
The Customer: The vehicle owner is responsible for providing accurate vehicle specifications, conducting thorough pickup and delivery inspections, and maintaining clear documentation. Customers drive the evidence-gathering process but rely on carrier compliance for on-site damage sign-off.
How to Build a Damage Evidence File
Building a comprehensive damage evidence file requires organizing your pickup records, delivery notes, and visual proof into clearly categorized folders to substantiate an auto transport damage claim.
Maintaining a structured system prevents critical documentation from getting lost and ensures you can present an irrefutable case to carriers and insurers.
Folder 1: Before Pickup: Store your baseline records here, including high-resolution pre-shipping photos, a clean copy of the initial Bill of Lading (BOL), and your digital booking documents.
Folder 2: Delivery: Keep all drop-off documentation together, featuring delivery photos, the countersigned delivery BOL, and the driver's contact details or truck identification numbers.
Folder 3: Damage Documentation: Consolidate close-up macro shots, wide-angle environmental context photos, and detailed video files showing the precise location of the flaw.
Folder 4: Repair and Inspection: Save formal repair estimates, certified mechanic diagnostic reports, and parts replacement receipts to prove the financial extent of the issue.
Folder 5: Communication History: Archive every digital touchpoint, including email threads, customer support messages, text transcripts, and official claim correspondence.
Auto Transport Damage Claim: A Practical Decision Tree
A practical decision tree guides you through a step-by-step evaluation of your vehicle's condition, documentation, and policy coverage to determine whether your auto transport damage claim is viable.
Following this chronological evaluation sequence eliminates emotional reactions and clarifies your next strategic move.
Step 1: Is the damage new? Compare the delivery condition against your pre-shipping records. If the answer is no, it is likely a pre-existing blemish; if yes, proceed immediately to the next evaluation stage.
Step 2: Can you compare pickup and delivery condition? If you have matching visual records of the exact area, compare them directly; if not, gather other secondary evidence to support your position.
Step 3: Was the damage documented at delivery? Finding it noted on the initial delivery paperwork establishes much stronger documentation, while discovering it later requires collecting immediate post-delivery proof.
Step 4: Is the damage physically consistent with transport? Verify whether the flaw matches known transit risks like road debris or strap tension. If the cause is unclear, consider commissioning an independent professional inspection.
Step 5: Is the damage covered under the applicable policy? Cross-examine your findings against standard cargo policy terms, liability limits, and listed exclusions before filing your formal paperwork.
Common Mistakes That Make Auto Transport Damage Harder to Prove
Avoiding common tactical errors during inspection and documentation is vital because preventable mistakes routinely weaken valid auto transport damage claims and give carriers legitimate grounds for rejection.
Recognizing these pitfalls before they happen safeguards your right to fair compensation.
Mistake 1: Comparing Different Photo Angles: Evaluating pre-shipping photos taken from the front against delivery photos taken from the side makes it impossible to establish a reliable baseline comparison.
Mistake 2: Editing or Compressing Original Evidence: Submitting heavily compressed social media images or modifying original files strips away critical digital metadata and pixel quality needed for verification.
Mistake 3: Repairing the Damage Before Documenting It: Commencing professional body work or quick fixes before filing claims and securing independent estimates destroys physical proof.
Mistake 4: Throwing Away Damaged Parts: Discarding broken trim pieces, clips, or components prevents certified mechanics from inspecting the physical point of impact.
Mistake 5: Describing Damage Too Vaguely: Submitting general statements like car is damaged instead of precise descriptions, such as a new 4-inch scratch on the rear passenger-side door, leaves room for dispute.
Mistake 6: Mixing Multiple Damage Events: Failing to separate distinct physical blemishes into individual claim entries confuses investigators and delays resolution timelines.
Final Auto Transport Damage Checklist
A comprehensive final checklist ensures you systematically manage every phase of your shipment to prevent oversight and protect your right to compensation if auto transport damage occurs.
Executing these structured steps from pre-pickup to post-delivery guarantees thorough preparation and evidence preservation.
Before Pickup
Photograph the vehicle comprehensively from all angles to establish a baseline.
Document all existing wear, chips, and historical blemishes.
Save original uncompressed digital files with intact metadata.
Review and sign the initial Bill of Lading (BOL) with accuracy.
At Delivery
Inspect the vehicle thoroughly before the driver departs the location.
Compare current physical conditions directly against your pickup photos.
Check low-clearance areas, lower bumpers, and frame rails for scraping.
Examine wheels, tires, glass, side mirrors, and exterior lights.
Document any new flaws explicitly on the delivery paperwork.
If Damage Is Found
Photograph the issue clearly using macro angles and scale references.
Describe the flaw specifically with precise dimensions and location notes.
Preserve all physical evidence and digital documentation securely.
Avoid unnecessary professional repairs before notifying the carrier.
Contact the appropriate carrier, broker, and insurer immediately.
Keep a complete, organized evidence file to support your claim.
Frequently Asked Questions About Auto Transport Damage
Clear answers to common questions regarding auto transport damage help vehicle owners navigate disputes, understand policy limitations, and protect their claims effectively.
Can a car be damaged during auto transport without obvious exterior damage?
Yes, structural frame stress, suspension component shifts, and alignment disruptions frequently occur without leaving visible surface marks.
How can I tell if a scratch happened during shipping?
New transit scratches feature sharp, unweathered edges and exposed fresh primer, whereas old marks look faded, oxidized, or filled with road grime.
What if I discover auto transport damage after signing the delivery paperwork?
Document the flaw immediately with timestamped photos, notify the carrier and broker in writing within 24 hours, and preserve all delivery records.
What if the driver refuses to document the damage?
Avoid confrontation, photograph the delivery paperwork and vehicle condition independently, record truck details, and submit a written notice right away.
Does auto transport insurance cover mechanical problems?
Standard cargo policies only cover mechanical failures if they stem directly from transit accidents, improper loading impacts, or severe equipment mishandling.
Can a low-clearance vehicle be more vulnerable to transport damage?
Yes, lowered cars, sports cars, and vehicles with custom ground effects face a significantly higher risk of ramp scraping and undercarriage contact.
What should I do if damage appears after delivery?
Keep the vehicle parked, avoid immediate repairs, compile a comprehensive evidence file, and contact the transport provider promptly.
Does a clean Bill of Lading automatically prevent a damage claim?
A clean BOL makes filing more difficult because it legally indicates the vehicle was received in good condition, but hidden defects can still be challenged with strong supporting evidence.
Should I repair the vehicle before contacting the carrier?
Never authorize repairs before notifying the carrier and receiving explicit instructions, as altering the vehicle can forfeit your insurance claim.
How do I document hidden auto transport damage?
Schedule a certified mechanic inspection, obtain a detailed diagnostic report, and correlate any sudden vibrations, fluid leaks, or alignment issues directly with your transit timeline.